Developer Journal 2: Diamonds and Squares and Algorithms, oh my!
- Posted at
- .
Hey all,

The goal: reasonable looking terrain!
To further this goal, my brother tasked me with developing a tool to generate terrain. Not only do we want it to be relatively simple to use, but we also want to have some parameters that the players can adjust. But before we get that far, we have to be able to generate something.
The Diamond-Square Algorithm
The first thing that I worked on was a height map generator. A height map, or elevation map, is a representation of an area’s terrain, with contour lines or colors to specify elevation. In our particular case, it is a greyscale bitmap image. The luminosity represents the height at a given X, Y value, with black being low elevation and white being a high elevation. This file is then read by the game engine and rendered into three-dimensional terrain. (Okay, I know it’s not really three-dimensional, but it appears to be).
In order to generate this terrain and make it appear somewhat interesting I attempted to implement the Diamond-Square Algorithm.
Step 1 – Initialization

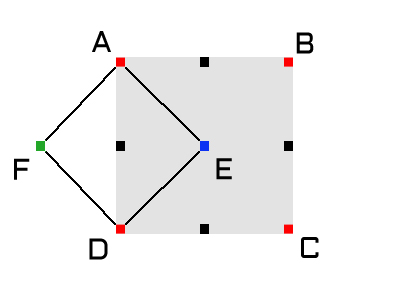
Start with a square image with a side length that is 1 + a power of 2 (e.g., 65, 129, 257). Initialize the four corners (points A, B, C, and D) of the height map with whatever height (color) you want. The procedure that I created generates random values each time, but you may want to start with the same values, allow seeding, or specify values within a certain range to shift the overall topography.
Step 2 – The Square Step

Now that we have our corners established, we need to calculate the value of the square’s center point, point E in the diagram above. To do this, take the arithmetic mean of the height at the four corners, and then add a bit of “noise” to make things more interesting; the more noise you add the rougher and less predictable the terrain will be. I chose to scale the noise based on the side length of the square, so that as the algorithm progress, the amount of noise added decreases.
Step 3 – The Diamond Step

Next, we need to calculate the height values for four different points along the perimeter of the square, the midpoints between AB, BC, CD, and DA. I’ve colored these black in the diagram above. Let’s take the midpoint of AD as an example for how to do the calculation.

We want to get an average of several points as we did in Step 2, but we don’t want to build a square around this point as it will create horizontal and vertical artifacts in our final image; cool, but not very natural looking. To find out the value for this point, you need to take the height values from the four points forming a diamond around it, each one exactly 1/2 the length of the side of the square away.
Note that one of these points, point F, is outside of the bounds of the image! There are a number of ways to handle this: you can throw out that value and divide the remaining by 3; you can “wrap” around and use a point 1/2 the length of the square from the far side (in this case, point E); or, you can take the point that is the “reflection” of the point that does not exist (in this case, point E). I chose to go with the last option, though I can see the benefit to using the other methods as well. Like the previous step, it is important to add a bit of noise to the calculated mean.
Step 4 – The Square Step… at half length

Do you notice anything about the image above? Those midpoints that we just calculated can now act as corners for smaller squares! 4 more squares, in fact. Apply the Square and Diamond steps to these four squares, and then divide those 4 squares into 16 squares, etc, etc. Continue alternating between these steps and halving the length of the side of the square until the length becomes negligible. If you have done it correctly, the algorithm will produce beautiful, cloud-like images that can be rendered as three-dimensional terrain. Wowzors!
Clean Up and Enjoy

A sample height map that was generated using the Diamond-Square algorithm.
When I was working on this algorithm I encountered a number of hilarious bugs. Missing even one plus or minus sign can destroy the entire result, or even give you unintended, but beautiful patterns in the resulting image.
I noticed a bit of creasing around one edge of my image initially, but I was able to cut the image so that the imperfections will be outside the bounds of the world. I may go back and try to figure out what is causing this (I have a hunch it has to do with integer math, but I’m not sure).
You should also make sure that the colors you are trying to save to the image are indeed legal colors. I had to implement a function to make sure that no value was ever too high or too low. Overall, I felt that this was a success. I’m not an expert programmer by any means, but if anyone would like help with this, I’d be glad to offer my assistance.
Next up, creating a texture map to go with the height map!
Stay tuned!
Cheers,
S
Resources
- Terrain Generation with the Diamond-Square Algorithm, a cool Javascript implementation that shows the steps of the algorithm.
- Daniel’s Game Programming Blog
Comments
Daniel Beard said: 6 October 2013 at 00:30
Hey, thanks for linking to my blog post! This looks good 🙂
Sunhawk said: 6 October 2013 at 16:36
Thanks for providing a great resource!
And thanks for reading. 😀